Creating Foundation 1.5 Projects
To organize your work, Foundation groups all related files into separate logical units called projects. Schematic, HDL, and Finite State Machine (FSM) designs must be defined as elements in a project. The associated libraries as well as netlists, bitstream files, reports, and configuration files are all part of the project.
Each project is stored in a separate directory called the project working directory. The location of the project working directory is specified when the project is created. The name of the project working directory is the same as the name of the project.
A Foundation Series 1.5 project can be either a Schematic Flow project or an HDL Flow project. If you are using the Base or Standard products, only the Schematic Flow is available to you. Both flows are available to Base Express and Foundation Express users.
Schematic Flow Projects
A Schematic Flow project can have either top-level schematic or ABEL files. Top-level schematic designs can contain underlying schematic macros, HDL macros, LogiBLOX, ABEL, or Finite State Machine (FSM) macros.
To create a Schematic Flow project, perform the following steps.
- Open the Project Manager by clicking on the Project Manager icon (shown below) or by Start
 Programs
 Xilinx Foundation Series
 Xilinx Foundation Project Manager.

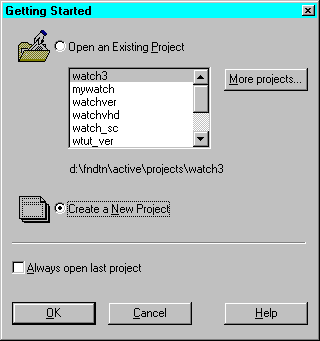
- Click the Create a New Project radio button on the Getting Started dialog box. Click OK. (To create new projects, you can also select File
 New Project from the Project Manager.)

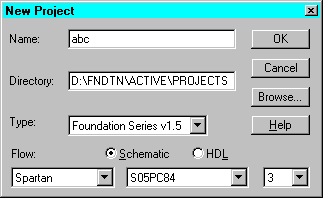
- Enter the project name, up to 8 characters, in the Name field of the New Project dialog box.
- Select a location for the project in the Directory box.
- Select Foundation Series v1.5 as the project type in the Type box.
- Select the Schematic Flow.
- Enter the device family, part, and speed of your target device.

- Click OK.
The Project Manager screen for the new project appears (see the “Project Manager - Schematic Flow” figure). The Project Manager screen contains three main sections.
- On the left side is the Hierarchy Browser consisting of a hierarchy tree of the project files on the Files tab and of the project implementation versions on the Versions tab.
- The upper right area includes the Flow tab showing the design flowchart with the functions used for Schematic Flow projects. This section also contains Contents, Reports, and Synthesis tabs. If you create any lower-level HDL or FSM macros for the project, you can use functions on the Synthesis tab to list and update them. From the Contents tab, you can view information on the Files shown in the Hierarchy Browser area. You can access system-created reports from the Reports tab.
- The bottom console area displays errors, warnings, and messages.
Refer to the “Project Manager” section later in this chapter for more information on the Project Manager and the tools accessed from it.
HDL Flow Projects (Express Only)
An HDL Flow project can contain VHDL and Verilog top-level designs with underlying VHDL and Verilog modules. HDL files can be created by the HDL Editor, Finite State Machine Editor, or other text editors.
LogiBLOX, schematics, and ABEL modules as well as XNF files can be instantiated in the VHDL and Verilog code using the “black box instantiation” method.
To create an HDL Flow project, perform the following steps.
- Open the Project Manager by clicking on the Project Manager icon (shown below) or by Start
 Programs
 Xilinx Foundation Series
 Xilinx Foundation Project Manager.

- Click the Create a New Project radio button on the Getting Started dialog box. Click OK. (To create new projects, you can also select File
 New Project from the Project Manager.)

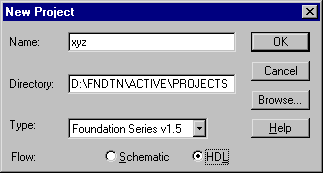
- Enter the project name in the Name box of the New Project dialog.
- Select a location for the project in the Directory box.
- Select Foundation Series v1.5 as the project type in the Type box.
- Select the HDL Flow.
NOTEWhen you select the HDL Flow button, the device family, part, and speed boxes for the target device are removed. You do not need to select a target device for HDL Flow projects until the design is synthesized.
| 
- Click OK.
The Project Manager screen for the new project appears. The Project Manager screen contains three sections.
- On the left side is the Hierarchy Browser consisting of a hierarchy tree of the project files on the Files tab and of the project versions on the Versions tab.
- The upper right area includes the Flow tab showing the design flowchart with the functions used for HDL Flow projects. This section also contains Contents and Reports tabs. From the Contents tab, you can view information on the Files and Versions shown in the Hierarchy Browser area. You can access system-created reports from the Reports tab.
- The bottom Console tab displays errors, warnings, and messages. The HDL Errors, HDL Warnings, and HDL Messages tabs display information about synthesis results when a specific version of the project is selected.
Refer to the “Project Manager” section later in this chapter for more information on the Project Manager and the tools accessed from it.


