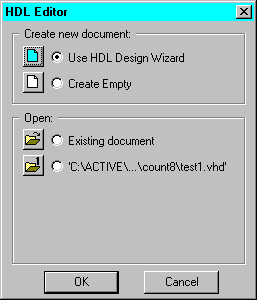
To begin entering or editing a design in HDL, click the HDL Editor icon, which is part of the Design Entry button on the Project Manager's Flow tab. The Editor dialog box displays and presents options for a design file, as shown in the following figure.

After creating an HDL file for an HDL Flow project, you must “add” the HDL file to the project. You can do this from within the HDL Editor by choosing Project ![]() Add to Project. Alternatively, you can add files to the project by selecting Document
Add to Project. Alternatively, you can add files to the project by selecting Document ![]() Add or Synthesis
Add or Synthesis ![]() Add HDL Source File(s) from the Project Manager.
Add HDL Source File(s) from the Project Manager.
In an HDL Flow project, the top level of the design is chosen prior to design “elaboration” in the Synthesis phase. For Verilog, it is not necessary to add files in a specific order. For VHDL, it is important to add the files in the order in which they must be analyzed. Any files depending on the successful analysis of another must appear below that file in the Files tab.
You can remove files from a project by clicking on the file and selecting Document ![]() Remove from the Project Manger.
Remove from the Project Manger.
Removing a file from a project does not erase the file from the disk. It merely removes it from the project.
The Foundation HDL Editor provides HDL language assistance through both the Language Assistant and the Online Synthesis Documentation. The Language Assistant, shown in the “VHDL Language Assistant” figure, provides templates to aid you in common VHDL logic functions, and architecture-specific features. The “Verilog Language Assistant” figure shows the Verilog Language Assistant that is available for editing Verilog files.
To access the Language Assistant, open the HDL Editor, and select Tools ![]() Language Assistant.
Language Assistant.
The HDL Editor also checks syntax. From the HDL Editor, select Synthesis ![]() Check Syntax to analyze the file.
Check Syntax to analyze the file.
Refer to the HDL Editor Help for more information on the Language Assistant.
Figure 6.1 VHDL Language Assistant |
Figure 6.2 Verilog Language Assistant |